Defining materials
Now that you have a general understanding of what materials are, lets look at how to use them. Materials do not need to be enabled or anything, the truth is you have been using them all along, just with whatever the default values where. Now, we're going to set some non-default values.
Actually, setting a material is fairly similar to creating a light source. The main difference is the name of the functions being used:
void GL.Material(MaterialFace face, MaterialParameter param, float value);
void GL.Material(MaterialFace face, MaterialParameter param, float[] value);
The face paramater in these functions specifies how the material will be applied to the objects polygons, implying that materials can affect the front and back faces of polygons differently. It can be one of three values:
- Front
- Back
- FrontAndBack
Only the faces you specify will be modified by the call to GL.Material. Most often you will use the same values for front and back faces (and 90% of the time back faces will be culled, so the back face value won't matter). The second paramater param tells OpenGL which material property we are assiging a value to. This can be any of the following:
- Ambient Ambient color of the material
- Diffuse Diffuse color of the material
- AmbientAndDiffuse Ambient AND diffuse color of material
- Specular Specular color of material
- Shininess Specular exponent (power)
- Emission Emissive color
Material Colors
The ambient, diffuse and specular components specify how a material interacts with a light source and, thus determine he color of the material. These values are set by passing Ambient, Diffuse or AmbientAnddiffuse to GL.Material as the MaterialParamater. Most often the same values are used for both the ambient and diffuse term, so much so that OpenGL provided a conveniance paramater AmbientAndDiffuse so you can specify both with 1 function call.
For example, if you wanted to set the ambient material color to red for the front and back of polygons, you would call this function:
float[] red = { 1f, 0f, 0f, 1f };
GL.Material(MaterialFace.FrontAndBack, MaterialParameter.Ambient, red);
Similarly, to set both the ambient and diffuse paramaters to blue would be:
float[] blue = { 0f, 0f, 1f, 1f };
GL.Material(MaterialFace.FrontAndBack, MaterialParameter.Ambient, blue);
Keep in mind that any polygons you draw after calling GL.Material will be affected by the material settings until the next call to GL.Material
Shinines
Try looking at something metallic and something cloth under a direct light. You'll notice that the metalic obejct appears to be shiny, while the clothisn't. This is because the light striking the cloth object is mostly scattered by the rough cloth surface, whereas light is reflecting directly on the smooth metal surface.
This image demonstrates the effects of different Specular material colors and Shininess specular exponent values.
- Left: Zero-intensity (0., 0., 0., 1.) specular material color
- specular exponent is irrelevant.
- Center: Low-intensity (.3, .3, .3, 1.) specular material color
- with a specular exponent of 10.0.
- Right: Full-intensity (1., 1., 1., 1.) specular material color
- with a specular exponent of 128.0.
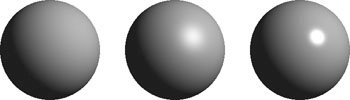
The sphere on the right looks like metal. The illusion of shininess is caused by the bright spot, known as a specular highlight. The sphere on the left is a more cloth-like material (t-shirt maybe), and therefore looks more dull. The middle sphere gives the look of most plastics.
The shininess of a material is simulated by the size of the specular highlight. This is controlled with a SINGLE scalar value, which you set with the MaterialParameter.Shininess paramater. This value can range from 0 to 128 (NOT 0 to 1), with 128 representing an extremly shiny material and 0 representing a non shiny mateiral.
You would make an object metalic like this:
GL.MaterialMaterialFace.FrontAndBack, MaterialParameter.Shininess, 128);
Emissive materials
The emissive property of a material allow you to cheaply simulate an object that emits light (thing TRON or maybe a glow in the dark toy). It's important to note that the objects dont' really emit light. That is, they will not light or affect nearby objects.
The emissive term is simply added to the objects other lighting components to make the object appear brighter than notmal. Here is an example of setting a dark light emission
float[] emissiveColor  = { .3f, .3f, .3f, 1f };
GL.MaterialMaterialFace.FrontAndBack, MaterialParameter.Emission, emissiveColor);
By default the emissive term is (0, 0, 0, 1), which means it has no contribution and is therefor effectivley turned off.
Color Tracking
Note, color tracking is not an official term. You will probably not hear it used outside the context of this book. But it's an easy way to describe setting the material color with a call to GL.Color.
Color Tracking allows you to set the color of a material with calls to GL.Color instead of using GL.Material, which often leads to smaller, more easy to read code. You can enable color tracking with the following call:
GL.Enable(EnableCaps.ColorMaterial);
After enabling color tracking you use the GL.ColorMaterial function to specify which material paramaters will by affected by future calls to GL.Color. The signature of this function is:
void GL.ColorMaterial(MaterialFace face, ColorMaterialParameter param);
Like always, the face can be set to Front, Back or FrontAndBack. The mode paramater can be:
- Ambient
- Diffuse
- Specular
- AmbientAndDiffuse
- Emssion
Most often you will be using the default values of this function (so you might not even have to call it). The default values are FrontAndBack, AmbientAndDiffuse. Lets look at some sample code that uses color tracking to set the diffuse color of an objects material:
GL.Enable(EnableCap.ColorMaterial);
GL.ColorMaterial(MaterialFace.FrontAndBack, ColorMaterialParameter.Diffuse);
GL.Color3(1f, 0f, 0f);
Primitives.DrawSphere();
As you can see, color tracking is very simple to set up and use. I almost never use it, i think giving multiple utilities to the same function is a bad idea. I like to explicitly type Material when i'm setting a material color component.