Drawing polygons in 3D
Altough you can (and will) do some interesting things with points and lines, polygons will give you the most power to create immersive 3D worlds. With that being said, the rest of Chapter 3 will be spend discussing polygons. Before we get into the specific polygon types supported by OpenGL (Triangles, Quadralatirals, Generic Poligons) we need to discuss a few things that pretain to all polygon types.
You draw all polygons by specifying several points in 3D space. These points specify a region that is then filled with color. At least, thats the default behaviour. However as you probably expect by now, the state machine controls the way in which a polygon is drawn. Trough the state machine you can change the drawing behaviour. Use the following function to change the way polygons are drawn:
void GL.PolygonMode(MaterialFace, PolygonMode);
OpenGL handles the front and back faces of polygons seperateley. A front face is any face of a polygon that is facing the camera. A back face is any face of a polygon that is facing away from the camera.
As a result, when you call GL.PolygonMode you need to change the face to which the change will apply. You do this by passing either MaterialFace.Front, MaterialFace.Back or MaterialFace.FrontAndBack as the first paramater.
The following values are valid for the second paramater:
- PolygonMode.Point Each vertex is rendered as a single point. This basicaly produces the same effect as calling
GL.BeginwithLinesas the argument. - PolygonMode.Line This will draw the edges of the polygon as a set of lines. This is similar to calling
GL.BeginwithLineLoop - PolygonMode.Fill This is the default state, which renders the polygon with the interior filled. This is the only state in which polygon smoothing takes effect.
If you want to see the back facing polygons of a model, you could render the front facing polygons as lines, and the back facing polygons solid. You can achieve this like so:
GL.PolygonMode(MaterialFace.Front, PolygonMode.Line);
GL.PolygonMode(MaterialFace.Back, PolygonMode.Fill);
If you have not changed the polygon mode for back facing poly's, the second line is redundant. This is because the default fill mode is Fill. But better safe than sorry.
On your own
Try to draw 5 squares (NOT CUBES) on screen. To draw a square, call GL.Begin with PrimitiveType.Polygon as it's argument. The put 4 vertices down.
Remember, the view goes from -1 to +1. Your vertices all have to be within that range. Keep their Z coordinates at 0.
Once all 5 are rendering, set the following polygon modes (each square will have a different mode)
GL.PolygonMode(MaterialFace.Front, PolygonMode.Line);GL.PolygonMode(MaterialFace.Back, PolygonMode.Point);GL.PolygonMode(MaterialFace.FrontAndBack, PolygonMode.Fill);GL.PolygonMode(MaterialFace.Back, PolygonMode.Line);GL.PolygonMode(MaterialFace.FrontAndBack, PolygonMode.Line);
See how the rendering changed.
Face Culling
Altough polygons are infinetley thin they still have two sides. They can be seen from either side. Sometimes, it makes sense to have each side displayed differently, and this is why some of the function presented require you to specify whether you're modifying the front face, back face or both. The takeaway is that rendering states for both sides of a polygon are stored seperateley.
Most often the player will only be able to see one side of a polygon. It is possible to tell OpenGL to not render polygons that the player can't see! For example, if you are looking at a ball, only half of the polygons are visible. This is where front and back facing polygons get interesting. If your geometry has no holes in it, that is if your geometry is a solid hull (as most objects in the real world are then back facing polygons will not be seen.
So, why waste time and CPU power transforming and shading them? Well, the answer is dont. OpenGL can automatically not render faces for you trough a process called culling. To use polygon culling, you must first enable it by calling:
GL.Enable(EnableCap.CullFace);
Then you need to specify which faces you want culled, front or back, by calling:
void GL.CullFace(CullFaceMode);
CullFaceMode can be CullFaceMode.Front, CullFaceMode.Back or CullFaceMode.FrontAndBack. Calling CullFaceMode.FrontAndBack will cause polygons to not render at all, this isn't particularly useful. The default value is Back.
After you've set your cullface you have to tell openGL what your Polygon Winding is. What is winding? Winding is the order in which you define the vertices of your polygons. Yes, the order you define them in matters!
Take this image for example:
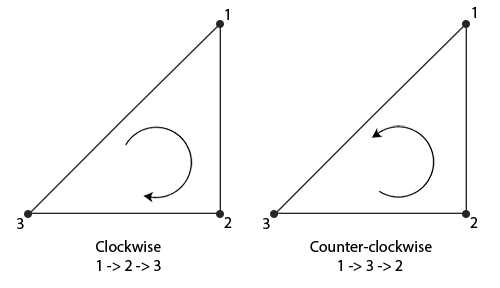
For simplicity, lets assume we have three vertices whos X Y and Z coordinates are all 0 1 and to respectivley. These are the vertices:
(0, 0, 0)
(1, 1, 1)
(2, 2, 2)
To render them clockwise (CW):
GL.Begin(PrimitiveType.Polygon);
    GL.Vertex3(0,0,0);
    GL.Vertex3(1,1,1);
    GL.Vertex3(2,2,2);
GL.End();
To render them counter-clockwise (CCW):
GL.Begin(PrimitiveType.Polygon);
    GL.Vertex3(0,0,0);
    GL.Vertex3(2,2,2);
    GL.Vertex3(1,1,1);
GL.End();
Winding directly affects polygon facing! If a polygon is front facing when wound CW, it will be back facing when wound CCW. OpenGL uses winding information to determine which polygons are front facing and which polygons are back facing.
By default OpenGL treats polygons with counter-clockwise (CCW) ordering as front-facing polygons. This can be changed with the following function:
void GL.FrontFace(FrontFaceDirection);
Try it! Define a polygon with 3 points in a counter-clockwise fashion. Enable culling. This will produce a triangle. Run your program and it will show up on screen. Now add this line of code before running your program:
GL.FrontFace(FrontFaceDirection.Cw);
And the triangle disapears! This is because you now set front facing polygons to be CW, and back facing ones to be CCW, the opposite of the default behaviour.
By default culling is disabled. In games this is a bad thing as rendering gets expensive. One of the first things most games do in Initialize is to enable culling and set it to cull out back faces. While the default CCW front face is great, we often also explicitly set it to CCW so that future programmers know how the system works by reading the code.
Anti-Aliasing polygons
As with points and lines you can choose to anti-alias polygons. You control polygon antialiasing by passing EnableCap.PolygonSmooth to GL.Enable or GL.Disable. You can check if anti aliasing is enabled by passing EnableCap.PolygonSmooth to GL.IsEnabled. As you might expect it is disabled by default. Here is an example of how to enable it:
if (!GL.Isenabled(EnableCap.PolygonSmooth)) {
    GL.Enable(EnableCap.PolygonSmooth);
}
On Your Own
On your own try to:
- Disable polygon anti-aliasing
- Draw a triangle on the left side of the screen
- Enable polygon anti-aliasing
- Draw a triangle on the right side of the screen
Send me a screenshot of the resulting window on skype (don't upload it anywhere, i don't want compression artifacts in this). I want to see what the difference looks like on your computer.