The Hero
Now that we can generate and render maps lets make our game a bit more interesting. We're going to add a hero!
New Project
Create a new project, call it TheHero. Make the standard window appear. Don't forget to set the working directory.
I'm going to be continuing from the Game class we built in the Creating Tiles chapter. You make a copy of that game file (Copy don't add a reference, we're going to be modifying this) and get to a point that the game can display this map:
Getting Started
I'm going to get started by giving the hero a spawn position. (Some code below is duplicated from the last example, just to give you an idea of where we are at)
namespace TheHero {
    class Game {
        protected Point SpawnTile = new Point(2, 1); // NEW

        protected Tile[][] map = null;
        protected int[][] mapLayout = new int[][] {
            new int[] { 1, 1, 1, 1, 1, 1, 1, 1 },
This is going to be the (zero based) tile that our hero spawns at. So, our hero should spawn in the upper left, right above that obstacle.
Now that we have a spawn position, how should we represent the Hero? We could make a bunch of variables in the Game class like heroPosition, heroHealth and heroSprite but as you can imagine this will get out of hand soon. A better approach is to make a Hero object, this way when we need to add new information to our hero we just add it to said object.
Knowing all of the properties a hero will have (health, position, sprite), the real question is will this information be shared amongst other classes? Enemies perhaps? In good OOP fashion we should account for this. Instead of creating a "Hero" class, let's create a "Character" class that specified characters can then extend.
Let's make a new file, call it Character.cs and start implementing our character.
using System.Drawing;
using GameFramework;

namespace CreatingTiles {
    class Character {
        public Point Position { get; private set; }
        public int Sprite { get; private set; }

        public Rectangle facingUpFrame1 { get; set; }
        public Rectangle facingDownFrame1 { get; set; }
        public Rectangle facingLeftFrame1 { get; set; }
        public Rectangle facingRightFrame1 { get; set; }

        public Rectangle displaySourceRect { get; set; }

        public Character (string spriteSheet, Point startPos) {
            Position = startPos;
            Sprite = TextureManager.Instance.LoadTexture(spriteSheet);
            displaySourceRect = facingDownFrame1;
        }

        public void Destroy() {
            TextureManager.Instance.UnloadTexture(Sprite);
        }

        public void Render() {
            TextureManager.Instance.Draw(Sprite, Position, 1.0f, displaySourceRect);
        }
    }
}
Looking at the above code, each character has a position and a sprite. These are obvious. Then come four rectangles, these are the positions on the sprite sheet to display for when the hero faces each direction. And finally displaySourceRect. This is the active region of the sprite sheet to display. The rest of the methods are pretty straight forward.
Displaying the hero
Let's add some more supporting code to actually display our hero on screen. The following code will all go into Game.cs. I included some extra code so you know where we are adding this.
namespace TheHero {
    class Game {
        protected Point SpawnTile = new Point(2, 1);
        protected Character hero = null; // NEW
        protected string heroSheet = "Assets/Link.png"; // NEW
In the Initialize method, create the hero object
public void Initialize() {
    TextureManager.Instance.UseNearestFiltering = true;
    map = GenerateMap(mapLayout, spriteSheets, spriteSources);

    // Everything below this comment is NEW
    hero = new Character(heroSheet, new Point(SpawnTile.X * 30, SpawnTile.Y * 30));

    hero.facingLeftFrame1 = new Rectangle(1, 1, 26, 30);
    hero.facingDownFrame1 = new Rectangle(59, 1, 24, 30);
    hero.facingUpFrame1 = new Rectangle(115, 3, 22, 28);
    hero.facingRightFrame1 = new Rectangle(195, 1, 26, 30);

    hero.displaySourceRect = hero.facingDownFrame1;
}
Why is SpawnTile.X and Y multiplied by 30? 30 happens to be the width / height of each of our tiles. If you remember, SpawnTile is in tile coordinates, but the render function of the hero works in pixel coordinates. We have to convert that second argument to pixels, so (tile Index * tile Size)
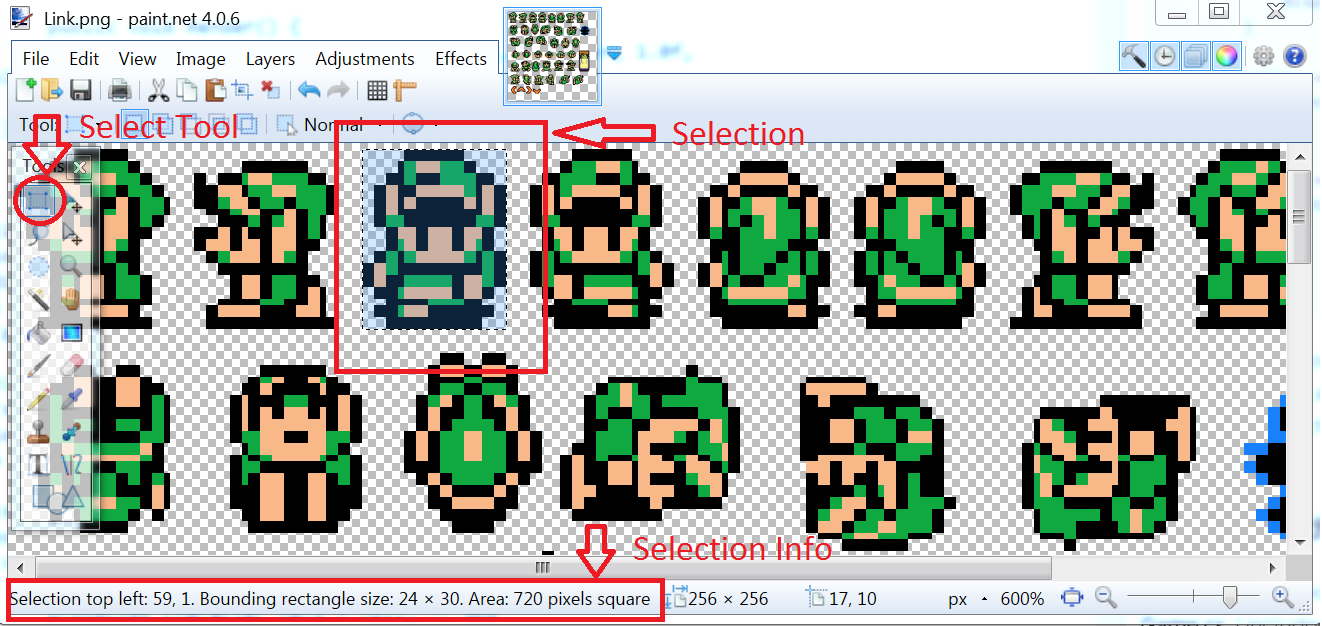
Where did those magic numbers for each rectangle frame come from? Photoshop! (Well, i actually use Paint.Net). I just made rectangle selections on the sprite sheet and copy / pasted the numbers into code.
If you install Paint.Net and want to get your own rectangle regions, this is what you should be looking at:
Anyway, we created a hero object, if you recall the Character class holds on to a reference of the sprite sheet it was created with. We must call it's Destroy method in the Program's Shutdown
public void Shutdown() {
    for (int h = 0; h < map.Length; ++h) {
        for (int w = 0; w < map[h].Length; ++w) {
            map[h][w].Destroy();
        }
    }
    hero.Destroy(); // NEW
}
Now the last thing that's left to do is to call the Character classes Render method.
public void Render() {
    for (int h = 0; h < map.Length; ++h) {
        for (int w = 0; w < map[h].Length; ++w) {
            map[h][w].Render();
        }
    }
    hero.Render(); // NEW
}
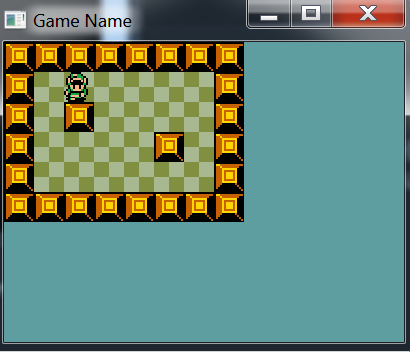
Go ahead, try it out. Running your program, the application should look something (exactly) like this: